
Hello everyone, in this blog post I will be explaining how and why I wrote the c6502, an integrated debugging and emulation suite that I developed for the MOS 6502.
The MOS 6502 is one of the most influential microprocessors in computing history. Introduced in 1975 by MOS Technology, the 6502 was designed to be a low-cost, high-performance alternative to the more expensive processors of the time, such as Intel’s 8080 and Motorola’s 6800. What made the 6502 revolutionary was its affordability, which opened the door for hobbyists, smaller companies, and educational institutions to embrace computing at a time when prices were otherwise prohibitive.
The 6502 found its way into iconic devices like the Apple I and Apple II, the Commodore PET, and the Atari 2600, fueling the growth of personal computing and gaming in the late 1970s and early 1980s. Its simple yet powerful instruction set made it an excellent learning tool for budding engineers and programmers. Despite its simplicity, the 6502’s efficiency and low transistor count allowed it to run at competitive speeds, solidifying its place in computing history. The design of the 6502 influenced later processors and remains a classic example of 8-bit microprocessor architecture.
When I started tinkering with 6502 assembly, I quickly realized there wasn’t a single tool that combined all the features I needed. Sure, there were great emulators, solid debuggers, and even some decompilers, but they were all separate. Switching between different programs disrupted the workflow, and I found myself wishing for an all-in-one tool that could handle emulation, debugging, and decompilation seamlessly. So, I created one :)
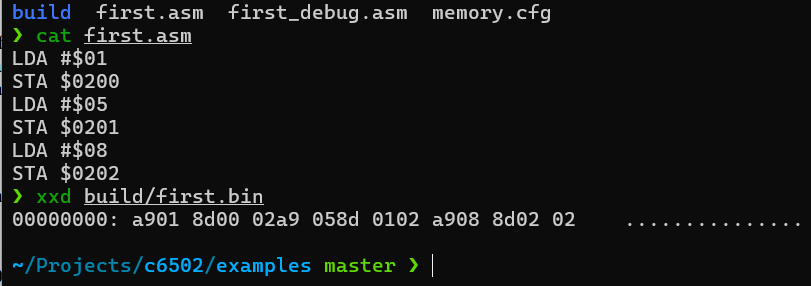
My biggest goal while writing c6502 was to make this software actually run the assembly and binary files written for mos6502. And that’s what happened. For this, I used the ca65 assembler and ld65 linker provided by cc65 and created my binary files. Then I was able to use these binary files with c6502.
A real 6502 code and binary that runs assembled on c6502:

Another goal of mine was to be able to monitor the changes in memory and registers in real time. I made this possible with the c6502.
With c6502, I wanted to create a tool that offers more than just emulation—it needed to provide a full development experience for 6502 enthusiasts. Here are the core features that make c6502 a powerful tool:
In c6502, the emulation process is designed to closely mimic the behavior of the MOS 6502 processor, step by step. Let’s take a deeper dive into how the emulator works behind the scenes.
Before the CPU can start executing any instructions, it needs to be properly initialized. This happens in the c_reset() function, where I reset the CPU registers (accumulator, program counter, stack pointer, and index registers X and Y). In this step, I also reset or set the necessary CPU flags.
For example, here’s what happens during a reset:
This ensures that the CPU is in a clean state, ready to start executing instructions from memory.
The core of the emulation process begins with fetching the next instruction to execute. Every instruction in a 6502 program is represented by an opcode, which is a numerical value that tells the CPU what to do next.
In c6502, the CPU fetches the opcode from memory based on the current value of the program counter (pc). The program counter always points to the next instruction to be executed. The fetched opcode is then printed for debugging purposes:
uint8_t opcode = memory->mem[cpu->reg.pc];
printf("PC: 0x%04x, Opcode: 0x%02x\n", cpu->reg.pc, opcode);
This simple step is crucial, as the CPU has to know what instruction to execute next based on the opcode it retrieves from memory.
After fetching the opcode, c6502 needs to determine which specific instruction it corresponds to. This is where the instruction set comes in. The instruction set in c6502 contains all the valid opcodes for the 6502 processor, along with the necessary handlers that define what each instruction does.
The emulator compares the fetched opcode against the known opcodes in the instruction_set[] array to find the right match:
for (size_t i = 0; i < set_size; i++) {
	if (opcode == instruction_set[i].opcode) {
		instruction = &instruction_set[i];
		break;
	}
}
Once the opcode is matched, c6502 knows how many CPU cycles the instruction will take and which handler functions to use for executing the instruction and calculating the address mode.
Different instructions use different methods to access memory, which are called addressing modes. The 6502 has several addressing modes, such as immediate, absolute, zero page, and more. The addressing mode determines how the CPU calculates the address of the data it’s going to operate on.
For example, in absolute addressing, the memory address is directly specified by two bytes following the opcode. The emulator reads these two bytes and combines them into a 16-bit address:
uint16_t address = ((mem->mem[cpu->reg.pc + 2] << 8) | mem->mem[cpu->reg.pc + 1]);
This address is then used by the instruction to read or write data in memory. By implementing various addressing modes (such as immediate, zero page, and indirect), c6502 is able to handle a wide range of 6502 instructions.
Once the addressing mode is determined and the memory address is calculated, the CPU executes the actual instruction using the appropriate handler. For example, if the opcode is for LDA (Load Accumulator), the CPU will load a value from memory into the accumulator, update the necessary flags (like ZERO and NEGATIVE), and increment the program counter accordingly.
Here’s how the LDA instruction is handled:
void lda_handler(c_cpu_t *cpu, m_memory_t *mem, uint16_t address)
{
	cpu->reg.acc = mem->mem[address];
	if (cpu->reg.acc == 0) {
		SET_FLAG(cpu->reg, FLAG_ZERO);
	} else {
		CLEAR_FLAG(cpu->reg, FLAG_ZERO);
	}
	if (cpu->reg.acc & 0x80) {
		SET_FLAG(cpu->reg, FLAG_NEGATIVE);
	} else {
		CLEAR_FLAG(cpu->reg, FLAG_NEGATIVE);
	}
}
This handler loads the value from memory into the accumulator, checks if the value is zero (which would set the ZERO flag), and determines if the value is negative by inspecting the highest bit (which would set the NEGATIVE flag).
Finally, the program counter (pc) is updated, and the CPU is ready to fetch the next instruction in the following cycle.
In summary, the emulation process in c6502 consists of five key steps: resetting the CPU, fetching the opcode, decoding the instruction, determining the addressing mode, and executing the instruction. These steps are repeated in a loop, allowing the CPU to process instructions one by one, just as the original hardware would have done.
By implementing these features in c6502, I aimed to create an emulator that not only runs 6502 assembly code accurately but also provides a transparent, real-time debugging experience that helps you better understand how the CPU operates under the hood.

One of the key elements that sets c6502 apart is its intuitive graphical user interface (GUI), designed to provide all the information and controls you need in one place. The interface makes debugging, emulation, and reverse engineering straightforward, and helps to visualize the internal state of the 6502 CPU while your program runs. Let me walk you through the main sections of the c6502 interface.
The large area on the left, labeled Virtual Interface, is the main display section where any visual output from the emulated system can be rendered. For example, if you’re developing a game or working on software that includes visual components, this is where they would appear. It allows you to monitor the virtual environment and interact with it during debugging and testing phases.
To the right of the virtual interface is the Disassembler panel. This section disassembles the binary code in real time, converting raw machine instructions back into 6502 assembly language. This is invaluable when you’re reverse-engineering binaries or inspecting how specific opcodes are being executed. The disassembly is shown line by line as the program progresses, making it easy to follow along with the instruction flow.
As you step through your code, this panel will update to reflect the current state of execution, highlighting the instruction that is currently being processed by the CPU.
On the right side of the interface, the Register Status panel provides a real-time snapshot of the CPU’s internal state. This includes:
This real-time feedback is essential for debugging, allowing you to track how your code modifies the CPU registers and how the flags are affected by different operations.
Below the register display, the Memory Status panel shows the current values stored in memory at specific addresses. This allows you to inspect and monitor changes in memory while the program executes. Each memory address and its corresponding value are listed, making it easy to detect issues like incorrect memory access or unexpected changes in data.
You can observe how memory is affected by each instruction, especially when working with load (LDA), store (STA), and jump (JMP) instructions, which directly interact with memory addresses.
The UI of c6502 was designed to give you all the information you need at a glance. Whether you’re testing a new piece of 6502 assembly code, debugging an old game, or analyzing binary files, the interface provides real-time, interactive feedback on every aspect of the CPU and memory. The layout keeps everything accessible, with no need to switch between different windows or tools—making development and debugging more efficient.
Developing c6502 has been a fulfilling experience, merging my love for retrocomputing with low-level programming and tool development. The result is a comprehensive suite that integrates emulation, debugging, and decompilation into a single, user-friendly tool. Whether you’re a 6502 enthusiast, a developer working with assembly code, or someone who enjoys reverse-engineering classic software, c6502 offers the tools you need to explore and debug programs at a deep level.
I hope this blog post gave you valuable insight into how c6502 works and why I created it. If you’re interested in trying it out, you can visit the GitHub repository, where you’ll find everything you need to get started.
Tags: [c mos mos6502 lowlevel © 2025 Levent Kaya. All Rights Reserved.